Friday, 19 August 2011

Canning Tomatoes


SO    MANY      TOMATOES!!!!!
Is it possible to have too many tomatoes? 

To that I say NO! I'm not a big fan of raw tomatoes (the gooeyness of them makes me spit them right back out) so one might be wondering why I have so many tomatoes. I LOVE to cook, and my husband loves pasta. So this year I grew 12 roma tomato plants, and I am getting a lot of tomatoes form them. I was at the point of three big bowls full of them, so I decided that I was at the point that it was worth doing the canning at that point. Canning tomatoes is relatively easy but it is time consuming. To start off with, pick the tomatoes. Then blanch for 45 seconds, where upon you move them into a ice water bath. This makes the skins of the tomatoes peel off super easily. Once they are all de-skinned, I dice them up, put them diced tomatoes into sterilized jars. Add some lemon juice then top up with heated tomato juice (or in the case of me being cheap, boiling water), then slap the lid on. I don't have a pressure cooker so I water bath them for 45 minutes. From my three big bowls of tomatoes I got 9 quarts of canned tomatoes. I'm super excited. 

Happy Homesteading!!


Monday, 15 August 2011

Homemade English Muffins

English muffins are great. Great for breakfast, like salmon egg benedict or for a breakfast sandwich. Great for an evening snack, like toasted english muffins with butter and strawberry jam. What's even better is homemade english muffins. That's right, homemade. They are super simple to make, and even easier to make when you have a break maker with a dough option. So here are the steps
1. Put 2 tablespoons of sugar and 1 teaspoon of salt in the bread basket


2. Add 2/3 cup milk and 2/3 cup of water, both heated till very warm to the touch. Then add 1/4 cup of softened butter or shortening. 


3. Then add 4 cups of flour, 1 teaspoon of baking powder and 2 1/4 teaspoons of bread machine yeast. I will vary the flour types. In this particular batch, I used 2 cups whole wheat, 2 cups white flour and 1/4 cup spelt (when substituting whole wheat for white flour, more flour needs to be added to up the consistency, so I've been experimenting and 1/4 cup extra seems to work okay).

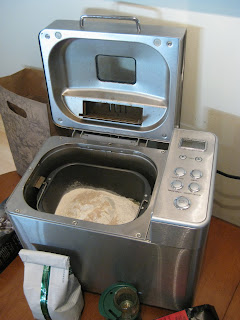
4. Put the bread basket in the bread machine, close lid and press dough option. Now, I do realize that not everyone has the most awesomest bread machine known to man like my bread machine, but I'm sure this recipe will work if you work it like a normal bread dough recipe with all the hand kneading and such. 
5. Once the bread machine beeps at you to inform you that it is done, you will open your machine to this lovely poofy dough. Knock it down and pull bread basket out of the bread machine. 

6. Pull dough out the bread basket and roll on floured countertop (prevents the dough from sticking to everything it encounters, including your hands)

7. Pinch the dough into two equal parts, and from there, pinch each part into five parts, resulting in 10 english muffin dough patties.Cover with a cloth and let them sit for half an hour. Once half an hour has passed, cook by placing them in a skillet set to medium temperature, 10 minutes per side (unless you notice that its burning, then do flip over). 


Of course, I forgot to get pictures of the muffins cooking, and the end result, but I do have a picture of my husband enjoying one smothered with raspberry jam. He was getting very impatient with my picture taking and complained that his mouth was watering and didn't want to poise anymore. 


I apologize for the poor picture taking but it was 10:30 at night so I was tired and I also had my own english muffin that I wanted to eat. 

Happy Homesteading!!


Thursday, 11 August 2011

Harvesting Time


Yesterday, I finally made time to do some gardening. It had rained a few times this week so I was being lazy and saying that was enough to sustain my plants. Well, I harvested a junk load of green beans. I'm now thinking I planted too many bean plants, and that I might have too many green beans!

I'll see how I'm doing in about a month or so, and if I have too many, I'm hoping to find someone to do a garden swap (my green beans for their squash, meat, etc). But I also got to harvest some roma tomatoes! Well, kind of. I'm cheating and calling this my first tomato harvest, because the real first tomato that was ripe had blossom end rot so therefore not really edible. A couple of them still need to ripen a bit, but I'm thinking that by next week, I'll be good to start canning them!

I'm still debating on whether to make currant jelly and/or rosemary jelly today. For sure I will be making english muffins. You know what, I will do a second post today in a couple of hours on homemade English Muffins. They are so much better than store bought (but only when you don't burn them, like I sometimes do) and actually super easy to make. My husband loves them. Lately, when we are hanging out with friends, the topic of my homemade bread and super gardening skills come up and my husband has been getting a lot of compliments on how he scored marrying me. He totally agrees and I always chime in a "Heck yes he did!". Makes me feel special, loved, useful and important.

Happy Homesteading!!

Friday, 5 August 2011

Making Raspberry Jam

This year I have at least triple the raspberry crop than I had last year, mind you, last year was a bad year for crops all around. Looking back on last year, I had to buy raspberries to make up the difference for my raspberry jam recipe. This year, and as I speak, I am making my second batch of the year, with raspberries still producing in the patch. I guess I'm going to have to make a batch of mix as I'm sure I won't have enough raspberries for a third batch. Hmmmmm, I'm going to have to get creative. Here though are some pictures of my friend and I making raspberry jam together last week. It was her first time making jam and she felt very domestic and wife-like.

Crushing the Raspberries


Juice!


In the pot it goes!


Splat


And now the copious amounts of sugar


LOTS OF SUGAR


Stirring in the Sugar


Now to boil


Once at a rapid boil for 1 minute, remove and add pectin

Spooning into sterile jars


Putting jars into water bath


And 7 minutes later, JAM!!
All but one of the jars properly sealed, so I just told my friend that she needed to use the unsealed one first. I wouldn't be surprised if she has gone through three already. 
So now I have four batches of jam; 2 raspberry and 2 strawberry. I'm going to maybe make some red currant jam today, but since I already have to make Lasagna Verde (only takes three hours of make, but totally worth it), I might have to put it off for another day. Hope you like the post and don't drool too much over my awesome jam making abilities. 

Happy Homesteading!!


Thursday, 4 August 2011

This Years War: Squash - The Timely Death of my Zucchini Plants


The pumpkin and butternut when newly planted and not dying


So last year it was the war of the tomatoes, and this year it is the war of the squash. As last year, I have learned something new.

1. Drought can bake dirt into a brick (raised garden bed)
2. Pouring water onto said brick will not help, as the water will just flow over to the sides and drain down the sides
3. Plants in the dirt brick will start to die

I'm hoping that I will still be able to save my pumpkin and my butternut squash plants. I still only have one pumpkin growing and two little butternut squashes fruiting. As for the timely death of my zucchini plants, well, I pull them up. Why you ask? Because its august and I haven't gotten one zucchini from them. I water them, I feed them, I prune them. No fruit on one plant while the other fruits but then rots on the bottom. As mentioned before, I have fed them so the blossom end rot is magically then. I tilled up the soil by the squash plants yesterday, add sulfur and fed them a good feeding, as well as watered till the soil was greatly moist. I'm going to moisten again once this post is done, and then again before bed. I'm hoping I don't lose the plants. But after this year, is there really anything else that I can screw up growing?

Happy Homesteading!!

Monday, 1 August 2011

Plant of the Week: Mint

One of the many bees that visit my mint patch daily


My backyard is a growing frenzy of mint. Currently, I have two types of mint growing, though I don't know what kind they are. One I'm pretty sure is wild mint because it grows by seeding and is everywhere, whereas the other mint is a perennial, stays in one spot and is actually a beautiful flowering plant (and the bees love it!). When I first discovered that I had the wild mint, my grandmother-in-laws first words where "Pull it all up! That stuff can overrun and ruin a garden!". Well, I didn't and I still haven't. I should probably go out there and pull some of it out as I did last year to keep it cornered to one area of the garden. Besides, then I could dry the mint I pull up. Yes, I dry my own mint leaves! After cutting the stalk (or in the case of wild mint, pulling the whole thing up), gather together and tie with a string. Afterwards, hang said string up high such as off the end of a curtain rod. Leave it there to hang out (puns unintended), checking on it in about a month to see if its dry. How do you know its dry? The leaves will crumble when you pinch them. I have used my dried mint leaves in teas and as a nice refreshing foot bath. I have tried using the mint fresh but it always tastes like green rather than mint. I'm hoping this year I might make some mint jelly, to give out as a present at Christmas and birthdays. Next time, I'll tell you about my perennial lavender. Be jealous!

Happy Homesteading!!